


Here we are at a new appointment with graphic design in a nutshell. In this tutorial, I will explain to you how to customize your packaging with InDesign using Packly‘s dieline. Before starting, let’s make a brief list of what you need.
What do you need? Just a few things!
- Packly’s diecut template in PDF
- A vector graphic design software, preferably Adobe Illustrator®.
Are you ready? Let’s have a look at the video and start creating the custom graphic design of your packaging with InDesign.
- Open InDesign and create a new document setting the page size you prefer.
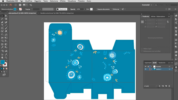
- Import the dieline: file menu > place > select the file > flag “show import options”. Inside the place PDF settings, enter 1-1 as page range and crop the file to media.
- Place the dieline on the upper left corner of the artboard.
- Resize the artboard: select the dieline and copy its width and height values shown in the control panel available on the top of the artboard.
- Lock the dieline layer.
Remember: thediecut template should never be modified/moved and have to be always on a different layer from the graphics one. - Add a new layer for your graphic design and drag it under the dieline layer. In this way, you will always view the cut and crease lines.
- Create your graphic design on the new layer. To create a uniform background, select the rectangle tool on the toolbox placed on the left side of the window and create a rectangle covering the artboard.
- Add background color: select the rectangle, in tool panel click twice on the fill color and enter the CMYK color percentage values for your background.
Remember: the graphic elements of the background (whether full backgrounds, texture or images) should always be extended to the bleed green lines, in order to avoid unaesthetic white edges, in case of sliding of the sheet during the cut. - Add texts and other graphic elements through the apposite tools available on the toolbox and place them wherever you want.
- Import images: file menu > open > select from your computer the file to upload. Color method: CMYK; resolution: 300 dpi; scale 1:1.
- Save the PDF printing file: file menu > export > save as > Adobe PDF (Print).
- Don’t include color profile: output > Profile Inclusion Policy > don’t include profile.
- Export the PDF.
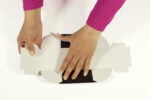
After saving your printing file, go to Packly, upload your artwork in the “Dielines/3Ds” section or inside MyPackly > Orders if you already placed the order, and then
Do you still have doubts? Contact us, we will be glad to answer your questions!